How to create a generator in Infrahub
Generators in Infrahub allow you to automatically create or modify data based on existing information in your database. They are defined in external repositories and can be developed and tested locally using infrahubctl generator.
In this guide, you'll learn how to develop a generator and integrate it into Infrahub.
What you'll build
You'll build a basic generator that:
- Reads information about Widget objects from the database
- Creates a number of Resource objects based on each Widget's count property
- Automatically runs when changes to Widget objects are proposed
Steps overview
- Prepare the data model by creating a schema and objects
- Create a GraphQL query to fetch data from Infrahub
- Implement a Python generator that creates the data
- Tie everything together in an
.infrahub.ymlfile - Test the generator locally with infrahubctl
- Deploy the generator to Infrahub
- Validate that the generator works in Infrahub's CI pipeline
Prerequisites
Before you begin, you'll need:
- Basic knowledge of Infrahub, Python, GraphQL, YAML, and Git
- Familiarity with Generators and how they work in Infrahub (see Generators topic)
- An Infrahub instance running locally or remotely
- A Git repository connected to Infrahub (see Adding an External Repository guide)
- infrahubctl installed and configured locally
- The repository cloned locally where you'll develop the generator
Step 1: Setting up the data model
In this step, you'll create the data structures needed for your generator, including a schema, group, and sample objects that the generator will process.
Create a new branch
We recommend creating a new branch in your Git repository for your generator development to avoid affecting the main branch. In this guide, we'll use a branch named create-widget-generator.
git checkout -b create-widget-generator
Create group
If you prefer a "as code" approach, use the object file method. Otherwise, you can create the group directly in the Infrahub UI.
- Using Object File
- Using the UI
- Create a file named
groups.ymlin theobjectsdirectory of your repository:
---
apiVersion: infrahub.app/v1
kind: Object
spec:
  kind: CoreStandardGroup
  data:
    - name: "widgets"
- Update the
.infrahub.ymlfile to include the new object file:
---
objects:
  - file_path: objects/groups.yml
- Commit the changes to your repository:
git add objects/groups.yml .infrahub.yml
git commit -m "Add widgets group"
git push
- Open the Infrahub UI in your browser
- Select the branch
create-widget-generator - Navigate to the Groups view (Object Management > Groups)
- Create a Standard group named
widgets
To verify the group was created successfully, navigate to the Groups view in the Infrahub UI and check that the widgets group appears in the list.
Create and load schema
This step is only necessary if you don't already have the schemas affected by the generator in your instance.
- Create a
widgets.ymlfile in theschemasdirectory of your repository:
# yaml-language-server: $schema=https://schema.infrahub.app/infrahub/schema/latest.json
---
version: '1.0'

nodes:
  - name: Widget
    namespace: Test
    label: Widget
    human_friendly_id:
      - name__value
    display_label: "{{ name__value }}"
    attributes:
      - name: name
        kind: Text
        unique: true
      - name: count
        kind: Number

  - name: Resource
    namespace: Test
    label: Resource
    human_friendly_id:
      - name__value
    display_label: "{{ name__value }}"
    attributes:
      - name: name
        kind: Text
        unique: true
Choose the method you already use to manage schema changes in your Infrahub deployment.
- Using Git Integration
- Using infrahubctl
- Update the
.infrahub.ymlfile to include the new schema file:
---
schemas:
  - schemas/widgets.yml
- Commit and push the changes to your repository
- Load the following schema using the infrahubctl schema command.
infrahubctl schema load schemas/widgets.yml --branch=create-widget-generator
schema 'widgets.yml' loaded successfully
1 schema processed in 8.453 seconds.
You should see new entries for Widget and Resource in the left-hand side menu of the Infrahub UI.
Create widget objects
Now that you have the schema loaded, you need to create objects that will be used by the generator:
This step is only necessary if you don't already have the objects affected by the generator in your instance.
You can also use an object file to create the widgets, though it's less relevant here than for the group creation.
- Open the Infrahub UI in your browser
- Select the branch
create-widget-generator - Navigate to the Widget view
- Create a new widget:
- Name:
widget1 - Count:
1 - Member of groups:
widgets
- Name:
- Create a second widget:
- Name:
widget2 - Count:
2 - Member of groups:
widgets
- Name:
Step 2: Create the GraphQL query
Next, create a GraphQL query that fetches the data your generator needs to process.
Create a query file
Create a widget_query.gql file in the queries directory of your repository:
query Widgets($name: String!) {
  TestWidget(name__value: $name) {
    edges {
      node {
        __typename
        id
        name {
          value
        }
        count {
          value
        }
      }
    }
  }
}
Test the query
To test the query you can use Infrahub's GraphQL Sandbox.
Access the sandbox by clicking your user icon in the bottom left corner and selecting GraphQL Sandbox. This tool allows you to run GraphQL queries and provides an interactive way to explore the schema.
-
Copy the above GraphQL query in the main section
-
In the variables section, add:
{
  "name": "widget1"
}
- Click the Execute button, this should return a response like:
{
  "data": {
    "TestWidget": {
      "edges": [
        {
          "node": {
            "__typename": "TestWidget",
            "id": "185526eb-2114-ce20-390a-c51aac78460a",
            "name": {
              "value": "widget1"
            },
            "count": {
              "value": 1
            }
          }
        }
      ]
    }
  }
}
You now have a working GraphQL query that retrieves the necessary data from Infrahub. You might want to keep the result of the query for later reference, as it will be useful when implementing the generator.
Step 3: Implement the generator
Now create a Python class that implements your generator logic. The generator creates TestResource objects equal to the widget's count value.
The class must:
- Inherit from
InfrahubGenerator - Implement an async
generate()method that processes data from your GraphQL query
If you aren't using convert_query_response, you can access the widget data directly from the data parameter passed to the generate() method.
If you're working with protocols, you can create TestResource objects using strict typing.
- Create a file named
widget_generator.pyin yourgeneratorsdirectory:
from infrahub_sdk.generator import InfrahubGenerator

class WidgetGenerator(InfrahubGenerator):
    async def generate(self, data: dict) -> None:
        # Access the widget as an SDK object
        widget = self.nodes[0]  # or self.store.get(data["TestWidget"]["edges"][0]["node"]["id"])
        widget_name: str = widget.name.value
        widget_count: int = widget.count.value

        # Create resources based on widget count
        for count in range(1, widget_count + 1):
            payload = {
              "name": f"{widget_name.lower()}-{count}",
            }
            obj = await self.client.create(kind="TestResource", data=payload)
            await obj.save(allow_upsert=True)
Step 4: Tie everything together in the .infrahub.yml file
Now that you have your GraphQL query and Python generator, edit your .infrahub.yml file to tie everything together.
- Add the following configuration to the file
.infrahub.yml:
---
generator_definitions:
  - name: widget_generator
    file_path: "generators/widget_generator.py"
    targets: widgets
    query: widget_query
    convert_query_response: true
    class_name: WidgetGenerator
    parameters:
      name: "name__value"

queries:
  - name: widget_query
    file_path: "queries/widget_query.gql"
For a complete explanation of the .infrahub.yml file format, see the infrahub.yml topic.
- Verify the configuration
Check that your .infrahub.yml file is correctly formatted by listing available Generators:
infrahubctl generator --list
If successful, you'll see output like:
Generators defined in repository: 1
widget_generator (generators/widget_generator.py::WidgetGenerator) Target: widgets
Step 5: Test the generator locally
Before deploying your generator to Infrahub, test it locally using the infrahubctl command-line tool.
Run the generator
Run the generator on both of your widget objects:
infrahubctl generator widget_generator --branch=create-widget-generator name=widget1
infrahubctl generator widget_generator --branch=create-widget-generator name=widget2
Verify the results
- Select the branch
create-widget-generatorfrom the branch selector - Navigate to Resource objects
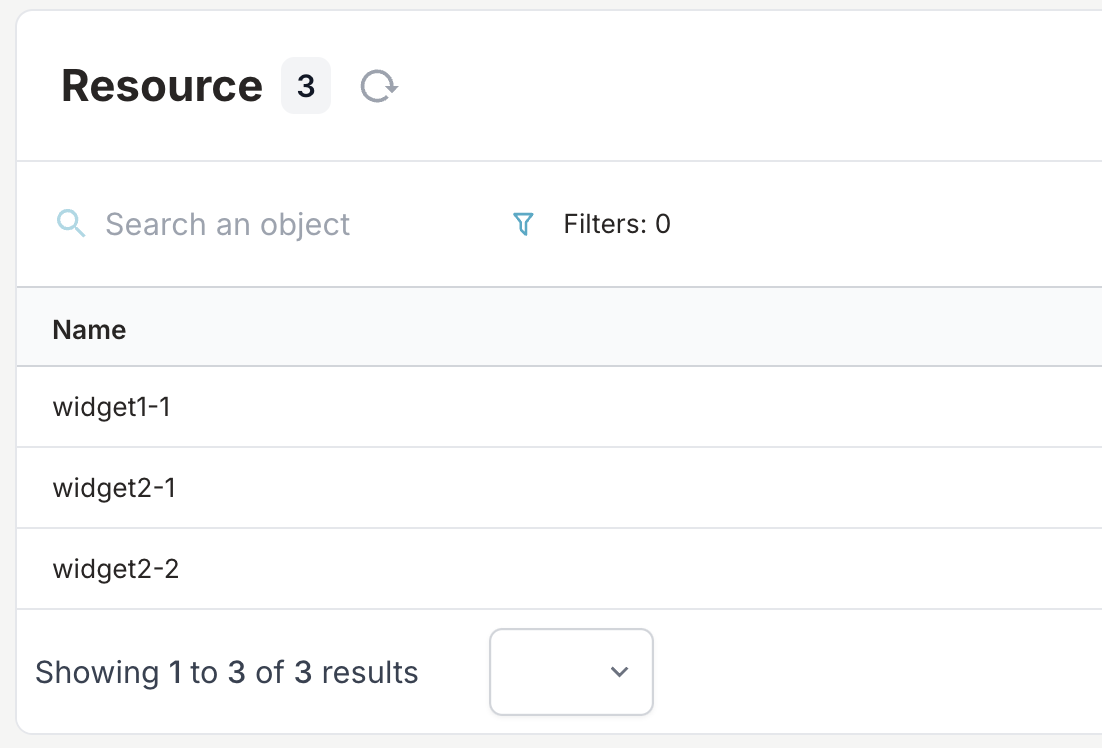
- You should see:
- One resource object for
widget1(namedwidget1-1) - Two resource objects for
widget2(namedwidget2-1andwidget2-2)
- One resource object for

You might want to cleanup this development data before merging your changes into the main branch.
Your generator worked as expected, it's now time to deploy it to Infrahub.
Step 6: Deploy to Infrahub
Now that you've tested your generator, deploy it to Infrahub.
Verify repository structure
Ensure your repository has the following structure:
Depending on your organization, you might also have schemas and objects directories in your repository.
your-repository/
├── .infrahub.yml
├── generators/
│   └── widget_generator.py
└── queries/
    └── widget_query.gql
Commit and push your code
Upload your generator code to the repository:
git add .
git commit -m "Add widget generator"
git push
Confirm the generator is imported
After pushing your changes, confirm that the generator is imported correctly by checking the Infrahub UI.
- Open the Infrahub UI in your browser
- Select the
create-widget-generatorbranch - Navigate to the Generators Definition view (Actions > Generator Definitions)
- You should see your
widget_generatorlisted there
If you don't see it verify the status of the repository in the Repository view and ensure the sync status is synced.
Proposed changes and merge
Now merge your development branch create-widget-generator into main.
We recommend using Infrahub's Proposed Changes feature to merge your changes. This allows you to review both data and code changes before merging.
- Create a Proposed Change
- Source branch:
create-widget-generator - Destination branch:
main - Name:
Add widget generator
- Source branch:
- Navigate to the Data and Files tabs to review the changes
- Back to the Overview tab, click the Merge button
Your generator is now deployed to Infrahub in the main branch and ready to be used.
Step 7: Run the generator in Infrahub's CI pipeline
Now let's verify that your generator automatically runs when new widgets are created:
- Create a new branch named
add-widget-3 - Navigate to the Widget objects in the Infrahub UI
- Create a new widget:
- Name:
widget3 - Count:
3 - Member of groups:
widgets
- Name:
- Create a Proposed Change
- Source branch:
add-widget-3 - Destination branch:
main - Name:
Add widget3
- Source branch:
Check generator results
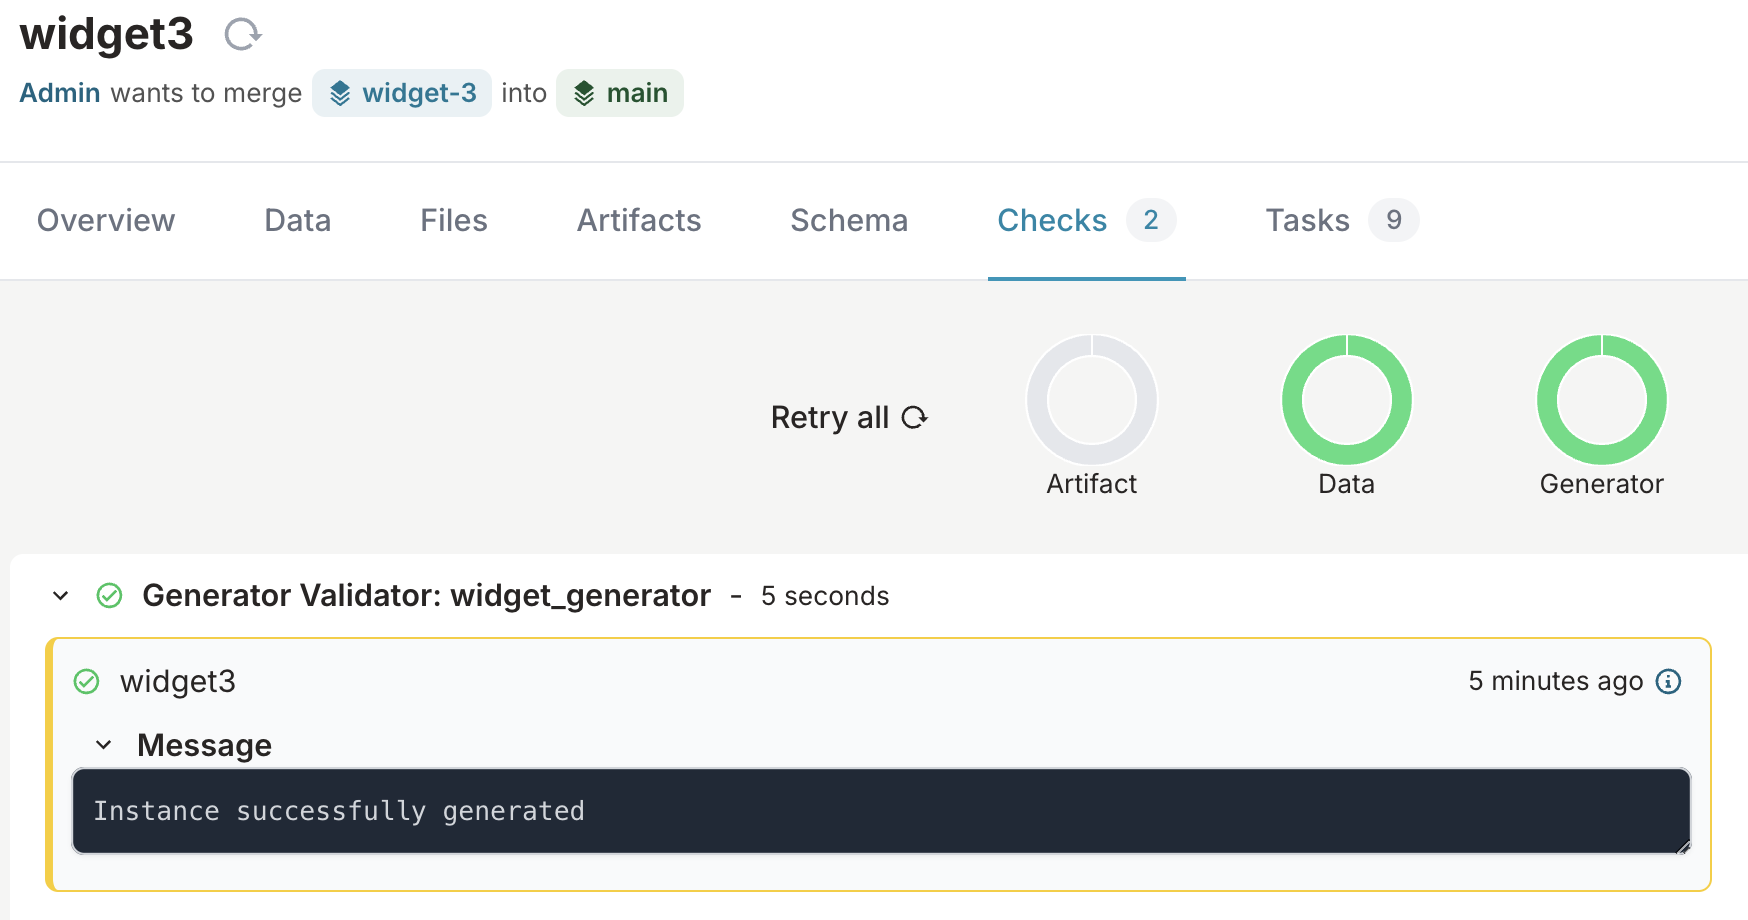
- Navigate to the Checks tab of your proposed change
- Wait for the generator CI check to complete

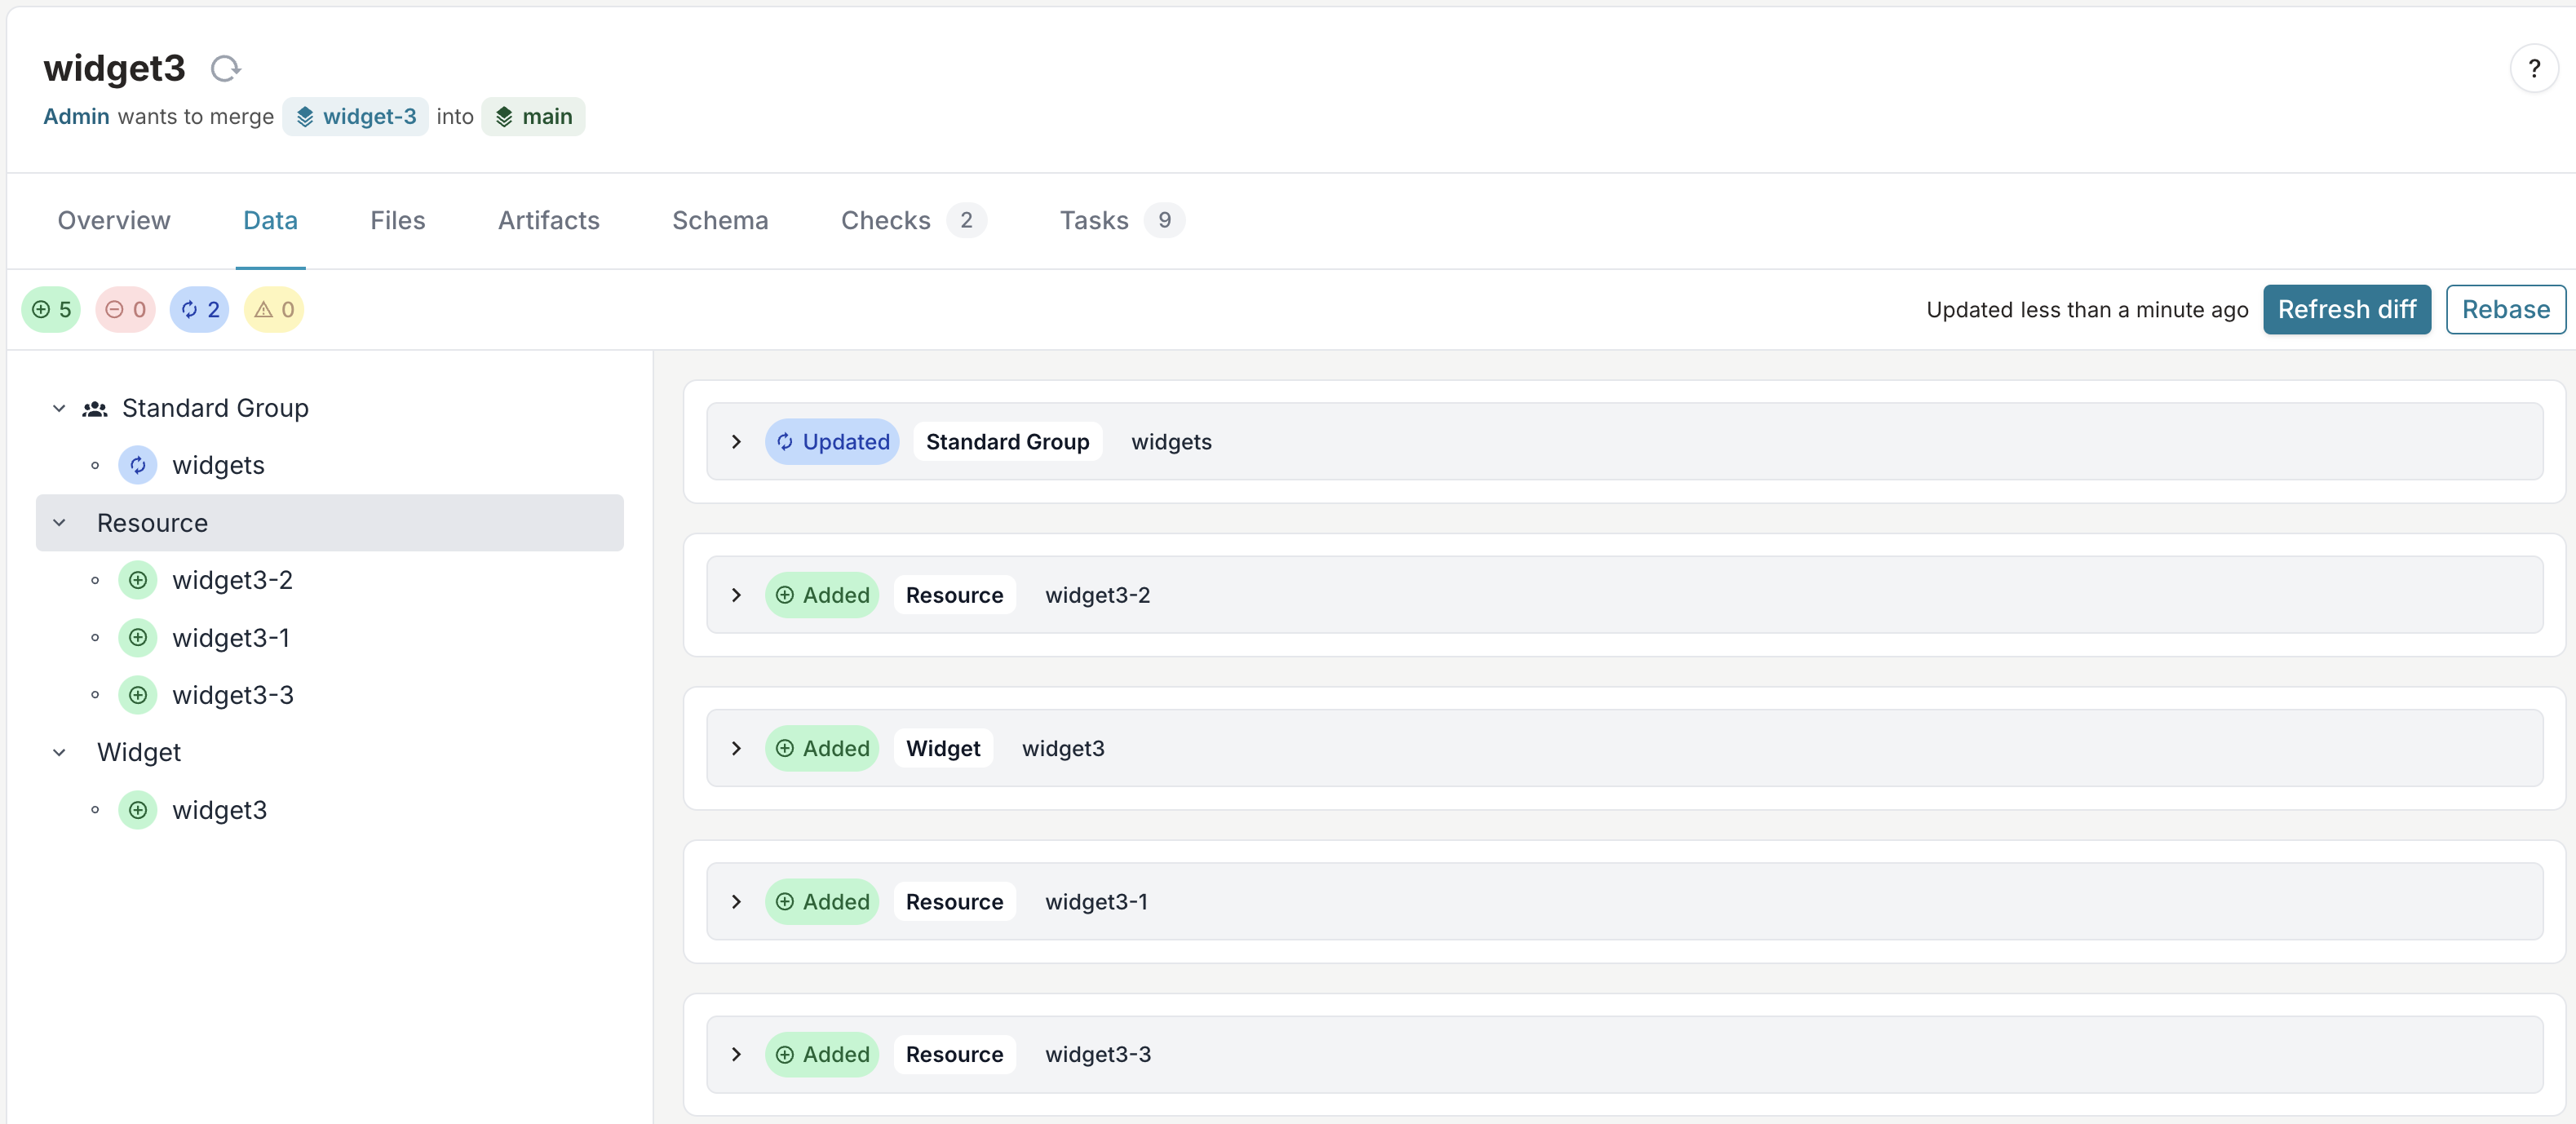
- Navigate to the Data tab
- Click the Refresh diff button to see the resources created by your generator

You should see three new resources (widget3-1, widget3-2, and widget3-3) automatically created by your generator.
Next steps
Now that you've created a basic generator, you can:
- Create Generators that handle a full object lifecycle, including creation, updates, and deletions
- Build idempotent Generators that can be run multiple times without creating duplicate data
- Add unit tests to your generator to ensure it behaves as expected
- Harden your generator by adding error handling and logging
Want to see how Generators can be used in production? Read our blog post on How to Turn Your Source of Truth into a Service Factory.