How to backup and restore Infrahub
This guide shows you how to create comprehensive backups of your Infrahub deployment and restore them when needed. You'll learn to backup the Neo4j graph database, object storage, and task management data to ensure complete data recovery capabilities.
Prerequisites
- Running Infrahub deployment (Docker Compose or Kubernetes)
- Administrative access to the Neo4j database
- Access to the object storage location (S3 or local filesystem)
- Sufficient storage space for backup files
- For cluster deployments: Understanding of your cluster topology
Create a full backup
Step 1: Install the backup tool
- infrahub-backup CLI (Recommended)
- Kubernetes Helm
- Docker Compose
- Remote Database
Install the infrahub-backup CLI tool:
curl https://infrahub.opsmill.io/ops/$(uname -s)/$(uname -m)/infrahub-backup -o infrahub-backup
chmod +x infrahub-backup
For Kubernetes deployments using Helm, see the dedicated backup guide:
If you prefer manual control, proceed to backup each component individually as described in the following steps.
Alternatively, you can use the legacy tool to backup a remote Neo4j database.
Step 2: Backup the databases
- infrahub-backup CLI
- Kubernetes Helm
- Docker Compose
- Remote Database
Create a backup of your running Infrahub instance:
./infrahub-backup create
The tool automatically:
- Checks for running tasks before starting (use
--forceto skip) - Creates a timestamped backup archive (for example,
infrahub_backup_20250129_153045.tar.gz) - Backs up Neo4j database with metadata (configurable with
--neo4jmetadata) - Backs up Prefect/PostgreSQL task management database
- Calculates SHA256 checksums for integrity verification
We plan to add object storage backup in a future release. Handle object storage backups separately for now.
For Kubernetes deployments using Helm, see the dedicated backup guide:
Connect to your Neo4j container and create a backup:
# Connect as neo4j user to avoid permission issues
docker exec -it -u neo4j infrahub-database-1 bash

# Create backup directory and run backup
mkdir -p backups
neo4j-admin database backup --to-path=backups/

# Verify backup creation
ls backups/
# Output: neo4j-2025-03-24T19-57-18.backup
Backup the Prefect PostgreSQL database containing task logs and execution history:
# Export Prefect database (using default credentials)
docker compose exec -T task-manager-db \
  pg_dump -Fc -U postgres -d prefect > prefect.dump
For remote database backups using the Python utility:
# Clone the repository or use Docker image
python -m utilities.db_backup neo4j backup \
  --database-url=172.28.64.1 \
  /infrahub_backups

# If network access issues occur, use host network
python -m utilities.db_backup neo4j backup \
  --host-network \
  --database-url=172.28.64.1 \
  /infrahub_backups
Step 3: Backup the object storage
The object storage layer holds all file content (file objects and artifacts) outside of the graph database. The graph database references this content through storage_id values, so both must be backed up together to maintain consistency.
- S3 Storage
- Local Filesystem
If using S3 for object storage, use AWS CLI or your preferred S3 backup tool:
# Sync S3 bucket to local backup directory
aws s3 sync s3://your-infrahub-bucket /backup/object_store/
For local filesystem storage, copy the object storage directory:
# Copy object storage directory to backup location
docker compose cp infrahub-server:/opt/infrahub/storage/. /backup/object_store/
Restore from backup
Step 1: Prepare the environment
Ensure Infrahub services are running before starting the restore process. You can start from a scratch/blank deployment.
- infrahub-backup CLI
- Kubernetes Helm
- Manual Process
Restore from a backup archive:
./infrahub-backup restore infrahub_backup_20250129_153045.tar.gz
The tool automatically:
- Validates backup integrity using checksums
- Wipes cache and message queue data
- Stops application containers
- Restores PostgreSQL database first
- Restores Neo4j database with metadata
- Restarts all services in correct order
For Kubernetes deployments using Helm, see the dedicated restore guide:
If restoring manually, follow the steps below for each component.
Step 2: Restore the databases
- infrahub-backup CLI
- Kubernetes Helm
- Docker Compose
- Remote Database
This is automatically handled by infrahub-backup.
For Kubernetes deployments using Helm, see the dedicated restore guide:
# Stop app services
docker compose stop task-worker infrahub-server task-manager

# Copy backup directory to container
docker cp database-backup infrahub-database-1:/tmp/backup

# Connect to container as neo4j user
docker exec -it -u neo4j infrahub-database-1 bash

# Drop existing database
cypher-shell -d system -u neo4j
DROP DATABASE neo4j;
exit;

# Clean residual data
rm -rf /data/databases/neo4j
rm -rf /data/transactions/neo4j

# Restore from backup
neo4j-admin database restore \
  --from-path=/tmp/backup neo4j \
  --overwrite-destination=true

# Recreate database
cypher-shell -d system -u neo4j
CREATE DATABASE neo4j;
SHOW DATABASES;
Restore the task manager PostgreSQL database
# Restore Prefect database
docker compose exec -T task-manager-db \
  pg_restore -d postgres -U postgres --clean --create prefect.dump

# Restart task manager to apply changes
docker compose restart task-manager
# Restore using Python utility
python -m utilities.db_backup neo4j restore \
  /infrahub_backups \
  --database-cypher-port=7687
Step 3: Restore the object storage
- S3 Storage
- Local Filesystem
# Restore S3 bucket from backup
aws s3 sync /backup/object_store/ s3://your-infrahub-bucket
# Restore object storage directory into the container
docker compose cp /backup/object_store/. infrahub-server:/opt/infrahub/storage/
Step 4: Restart Infrahub services
- infrahub-backup CLI
- Kubernetes Helm
- Docker Compose
This is automatically handled by infrahub-backup.
For Kubernetes deployments using Helm, see the dedicated restore guide:
Restart services in the correct order to ensure proper initialization:
# Restart API servers first
docker compose restart infrahub-server

# Then restart task workers
docker compose restart task-worker
Validation
Verify your restoration was successful:
-
Check database status:
docker compose exec -T database cypher-shell -u neo4j \-c "SHOW DATABASES;"The Neo4j database should show as "online".
-
Verify Infrahub API:
curl http://localhost:8000/api/schema/summaryYou should receive a valid schema response.
-
Check task manager:
docker compose logs task-manager --tail 50Logs should show normal operation without errors.
-
Test artifact retrieval: Access the Infrahub UI and verify that stored artifacts (Transformations, queries) are accessible.
Backup and restore Neo4j clusters Enterprise Edition
If you're running Infrahub with a Neo4j cluster, follow these steps to backup from one node and restore to another while maintaining cluster integrity.
Prerequisites for cluster operations
- Neo4j cluster with at least 3 nodes
- Administrative access to all cluster nodes
- Understanding of your cluster topology (leader and follower nodes)
Always run backup and restore commands as the neo4j user inside containers to avoid permission issues with data files.
Example cluster topology
| Node | Role |
|---|---|
database | Leader |
database-core2 | Follower |
database-core3 | Follower |
Step 1: Create backup from a follower node
docker exec -it -u neo4j infrahub-database-core2-1 bash
mkdir -p backups
neo4j-admin database backup --to-path=backups/ neo4j
ls backups
# Output should include:
# neo4j-2025-03-24T19-57-18.backup
Step 2: Transfer backup to target node
# Copy from source container to local
docker cp infrahub-database-core2-1:/var/lib/neo4j/backups/neo4j-2025-03-24T19-57-18.backup .

# Copy from local to target container
docker cp neo4j-2025-03-24T19-57-18.backup \
  infrahub-database-core3-1:/var/lib/neo4j/
Step 3: Drop database cluster-wide
Connect to any cluster node:
cypher-shell -d system -u neo4j
DROP DATABASE neo4j;
SHOW SERVERS;
Step 4: Clean target node data
Connect to the target container:
docker exec -it -u neo4j infrahub-database-core3-1 bash
Remove any existing data to avoid corruption:
rm -rf /data/databases/neo4j
rm -rf /data/transactions/neo4j
Then restart the container to ensure a clean state:
docker restart infrahub-database-core3-1
Step 5: Restore backup on target node
Reconnect to the container:
docker exec -it -u neo4j infrahub-database-core3-1 bash
Run the restore command:
neo4j-admin database restore \
  --from-path=/var/lib/neo4j/neo4j-2025-03-24T19-57-18.backup neo4j
Step 6: Identify seed instance id
Connect via Cypher shell (on the system database):
cypher-shell -d system -u neo4j
Run:
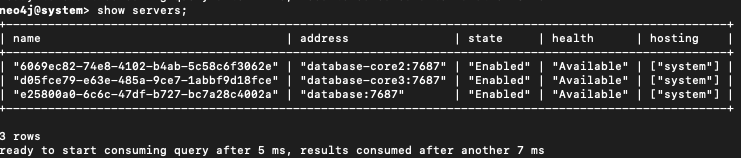
SHOW SERVERS;
Note the serverId for your target node (example: d05fce79-e63e-485a-9ce7-1abbf9d18fce).

Step 7: Recreate database from seed
Run the following Cypher command:
CREATE DATABASE neo4j
TOPOLOGY 3 PRIMARIES
OPTIONS {
  existingData: 'use',
  existingDataSeedInstance: 'd05fce79-e63e-485a-9ce7-1abbf9d18fce'
};

Step 8: Verify cluster sync
Check that the database is coming online:
SHOW DATABASES;

Then validate cluster sync status:
SHOW SERVERS;

All nodes should eventually show the Neo4j database as online.
- If nodes show as dirty or offline, check logs and verify
/data/databases/neo4j/neostoreexists - The
CREATE DATABASE ... OPTIONS { existingData: 'use' }command is required to register restored data with the cluster
Restore cluster backup to standalone instance
If you need to analyze data from a production cluster in an isolated environment, follow these steps to restore a cluster backup to a standalone Neo4j instance.
Step 1: Create cluster backup
Create a backup from any cluster node:
neo4j-admin database backup --to-path=backups/ neo4j
# Resulting file: neo4j-2025-03-24T19-57-18.backup
Step 2: Transfer backup to standalone instance
docker cp neo4j-2025-03-24T19-57-18.backup \
  infrahub-database-1:/var/lib/neo4j/
Step 3: Prepare standalone instance
Connect to the container:
docker exec -it -u neo4j infrahub-database-1 bash
Clean any existing Neo4j database (optional but recommended):
rm -rf /data/databases/neo4j
rm -rf /data/transactions/neo4j
Drop the Neo4j Database
cypher-shell -d system -u neo4j
DROP DATABASE neo4j;
SHOW SERVERS;
Step 4: Restore the backup
Restore the backup file:
neo4j-admin database restore \
  --from-path=/var/lib/neo4j/neo4j-2025-03-24T19-57-18.backup neo4j
Step 5: Create the database
Run the following Cypher command:
CREATE DATABASE neo4j
Step 6: Verify the status
Check that the database is coming online:
SHOW DATABASES;

Then validate database status:
SHOW SERVERS;

This process restores only data, not cluster roles, replication, or configuration settings.
Advanced usage
Using the Python-based backup utility
The Python-based utility (utilities/db_backup) is still available in the main Infrahub repository but is being replaced by infrahub-backup. Use it only if infrahub-backup doesn't meet your specific requirements.
Use non-default ports
If your deployment uses custom ports, specify them during backup and restore operations:
# Backup with custom backup port
python -m utilities.db_backup neo4j backup \
  --database-backup-port=12345 \
  /infrahub_backups

# Restore with custom Cypher port
python -m utilities.db_backup neo4j restore \
  /infrahub_backups \
  --database-cypher-port=9876
Run backup tool via Docker
If you don't have the repository cloned locally, run the backup tool directly from the Infrahub Docker image:
docker run --rm \
  -v /var/run/docker.sock:/var/run/docker.sock \
  registry.opsmill.io/opsmill/infrahub \
  python -m utilities.db_backup
Related resources
- Understanding database backup architecture - Learn how the backup system works internally