Working with resource manager
This guide shows you how to create resource pools and allocate resources from them automatically. Resource Manager eliminates manual IP address and number assignment by providing dynamic allocation from predefined pools.
This guide uses a simplified schema. If you already have the demo schema loaded, skip the schema loading section and adapt the examples to your existing setup.
What you'll build
In this guide, you'll learn how to implement three common Resource Manager use cases:
- IP Address Allocation: Assign IP addresses to devices from address pools
- IP Prefix Allocation: Allocate customer subnets from larger prefix pools
- Number Allocation: Generate sequential VLAN IDs from number pools
Prerequisites
- A running Infrahub instance
- Basic understanding of GraphQL
- Understanding of the Resource Manager concepts
infrahubctlCLI installed (for schema loading)
Load the schema
This step is only necessary if you don't already have the schemas affected by the Resource Manager in your instance.
- Create a schema.yml file in the schemas directory of your repository:
# yaml-language-server: $schema=https://schema.infrahub.app/infrahub/schema/latest.json
---
version: "1.0"
generics:
  - name: Service
    namespace: Infra
    description: "Services"
    human_friendly_id: ["name__value"]
    include_in_menu: false
    order_by:
      - name__value
    display_label: "{{ name__value }}"
    attributes:
      - name: name
        kind: Text
        label: Name
        optional: false
        order_weight: 1

nodes:
  - name: IPPrefix
    namespace: Ipam
    include_in_menu: false
    inherit_from:
      - "BuiltinIPPrefix"
    description: "IPv4 or IPv6 network"
    label: "IP Prefix"
    relationships:
      - name: vlan
        peer: IpamVLAN
        optional: true
        cardinality: one
        kind: Attribute

  - name: IPAddress
    namespace: Ipam
    include_in_menu: false
    inherit_from:
      - "BuiltinIPAddress"
    description: "IP Address"
    label: "IP Address"

  - name: VLAN
    namespace: Ipam
    description: "A VLAN is isolated layer two domain"
    label: "VLAN"
    icon: "mdi:lan-pending"
    include_in_menu: true
    order_by:
      - name__value
    display_label: "{{ name__value }}"
    attributes:
      - name: name
        kind: Text
        unique: true
        order_weight: 2
      - name: description
        kind: Text
        optional: true
      - name: vlan_id
        kind: Number
        order_weight: 3

  - name: Device
    namespace: Infra
    label: "Device"
    icon: "mdi:server"
    human_friendly_id: ["name__value"]
    order_by:
      - name__value
    display_label: "{{ name__value }}"
    attributes:
      - name: name
        kind: Text
        label: Name
        optional: false
        unique: true
    relationships:
      - name: primary_ip
        label: "Primary IP Address"
        peer: IpamIPAddress
        kind: Attribute
        cardinality: one

  - name: Service
    namespace: Customer
    description: "A Customer service"
    icon: "carbon:ibm-cloud-internet-services"
    label: "Customer Service"
    inherit_from:
      - InfraService
    relationships:
      - name: assigned_prefix
        label: "Assigned prefix"
        peer: IpamIPPrefix
        optional: false
        kind: Attribute
        cardinality: one
- Load the schema with this command:
infrahubctl schema load schema.yml
A CoreIPAddressPool allows you to dynamically allocate IP addresses from one or multiple source IP prefixes.
Creating an IP Prefix object
First, create an IP Prefix object that the Resource Manager will use as a resource.
You can create a prefix (for example, 10.100.0.0/24) either via the web interface or through the GraphQL interface.
- Via the Web Interface
- Via the GraphQL Interface
  mutation {
    IpamIPPrefixCreate(data: {
      prefix: {value: "10.100.0.0/24"},
      member_type: {value: "address"},
    })
    {
      ok
      object {
        id
      }
    }
  }
Take note of the id of the prefix, we will need id in the next step.
Creating an IP address Resource Manager
Next, create a Resource Manager of kind CoreIPAddressPool with the following properties:
- Name: My IP address pool
- Default Address Type:
IpamIPAddress(as defined in your schema) - Default Prefix Length: 24
- Resources:
10.100.0.0/24 - IP Namespace:
default
The CoreIPAddressPool can be created using the web interface, or by using this GraphQL mutation. Replace the id of the resource with the id of the prefix of the previous step.
- Via the Web Interface
- Via the GraphQL Interface
  mutation {
    CoreIPAddressPoolCreate(data: {
      name: {value: "My IP address pool"},
      default_address_type: {value: "IpamIPAddress"},
      default_prefix_length: {value: 24},
      resources: [{id: "<id of prefix>"}],
      ip_namespace: {id: "default"}
    })
    {
      ok
      object {
        id
        hfid
      }
    }
  }
Take note of the id and hfid of the CoreIPAddressPool, we will use it in the next steps.
Allocating an IP address out of the pool
We can now start allocating IP addresses out of the CoreIPAddressPool we created.
We can use the Resource Manager to allocate resources out of a pool in 2 different ways:
- Directly allocate a resource out of a pool. This is typically used when you need to allocate a resource that has no relation to other nodes. For example, allocating an IP address out of a pool that will be assigned to something that is not stored in Infrahub.
- Allocate a resource out of a pool to a relationship of a node. For example, create a device and allocate an IP address out of a pool and assign it to the device
Please refer to the Resource Manager Topic for further details.
Direct allocation of an IP address
Execute the following mutation to allocate an IP address out of the pool. Replace the id with the id of the CoreIPAddressPool we created previously.
- Via the GraphQL Interface
  mutation {
    InfrahubIPAddressPoolGetResource(
      data: {
        id: "<id of resource pool>",
        data: {
          description: "my first allocated ip"
        }
      }
    )
    {
      ok
      node {
        id
        display_label
      }
    }
  }
In the mutation we passed additional data to the allocated resource, in this case we passed a description attribute. This description attribute will be set on the IP address that was allocated. You can do this for any other attribute and relationship for the destination address type.
You can allocate resources in an idempotent way by specifying an identifier in the GraphQL mutation. This identifier links the resource pool with the allocated resource allowing us to create idempotent allocation behavior. This is crucial when you want to allocate resources in an idempotent way using Generators.
Execute this mutation twice, note the identifier. The resulting IP address should be the same, as well as the id. Replace the id with the id of the CoreIPAddressPool we created previously.
- Via the GraphQL Interface
  mutation {
    InfrahubIPAddressPoolGetResource(data: {
      id: "<id of resource pool>",
      identifier: "my-allocated-ip",
    })
    {
      ok
      node {
        id
        display_label
      }
    }
  }
Allocate IP address
IP address pools (CoreIPAddressPool) dynamically allocate individual IP addresses from source prefixes.
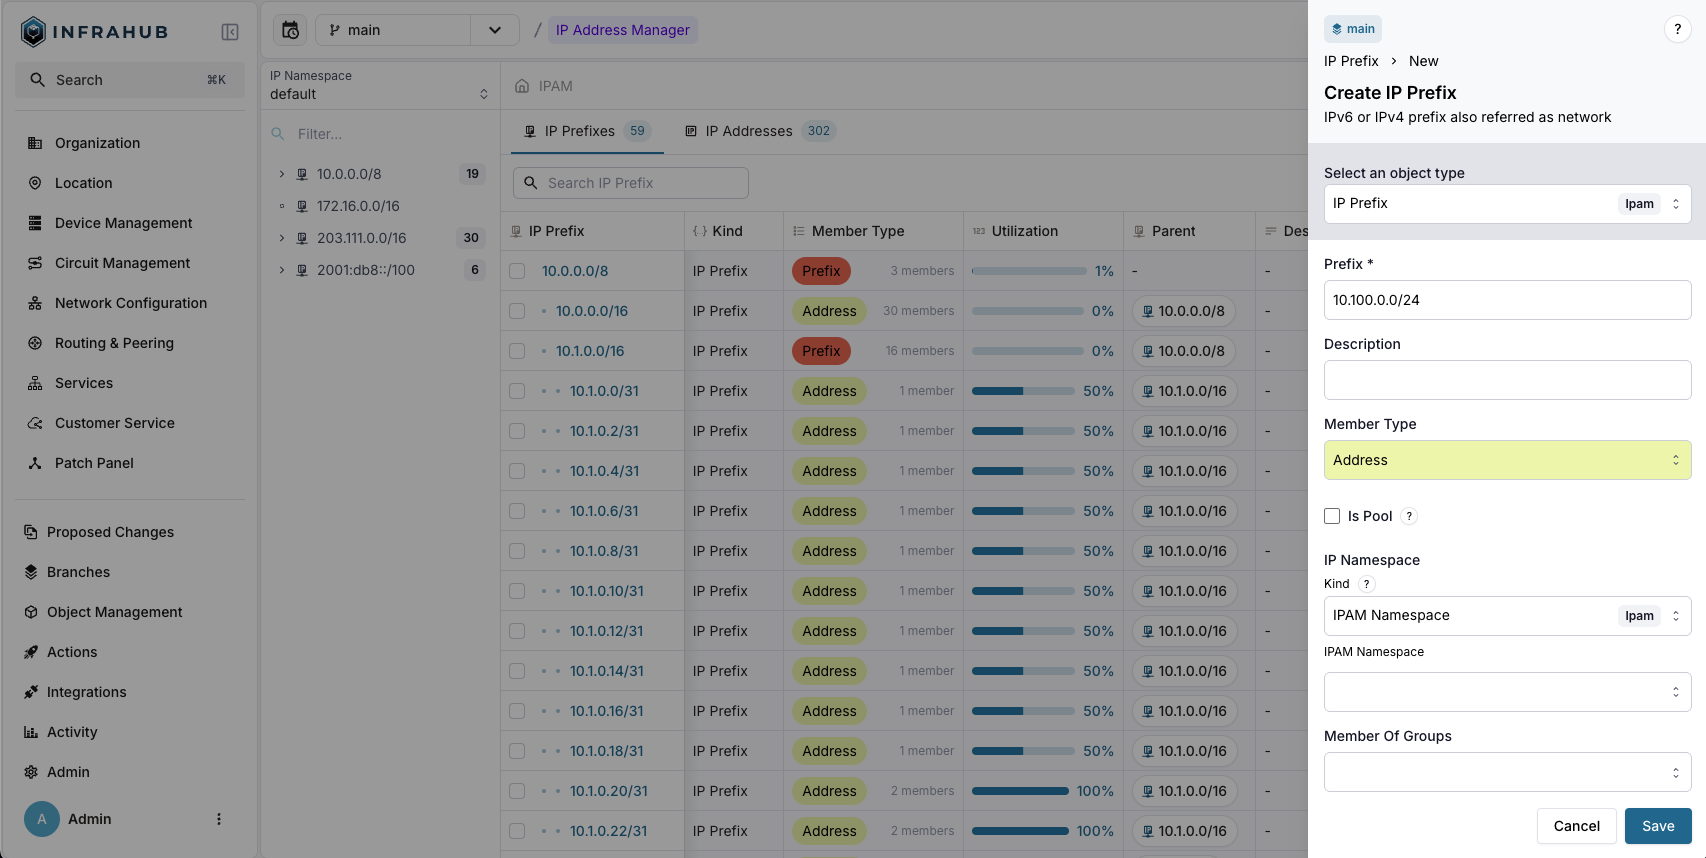
Step 1: Create an IP prefix object
Create the IP prefix that serves as the allocation source:
- Web interface
- GraphQL
Navigate to IPAM → IP Prefixes and create a new prefix with:
- Prefix:
10.100.0.0/24 - Member Type:
address
mutation {
  IpamIPPrefixCreate(data: {
    prefix: {value: "10.100.0.0/24"},
    member_type: {value: "address"}
  })
  {
    ok
    object {
      id
    }
  }
}
Save the prefix ID for the next step!
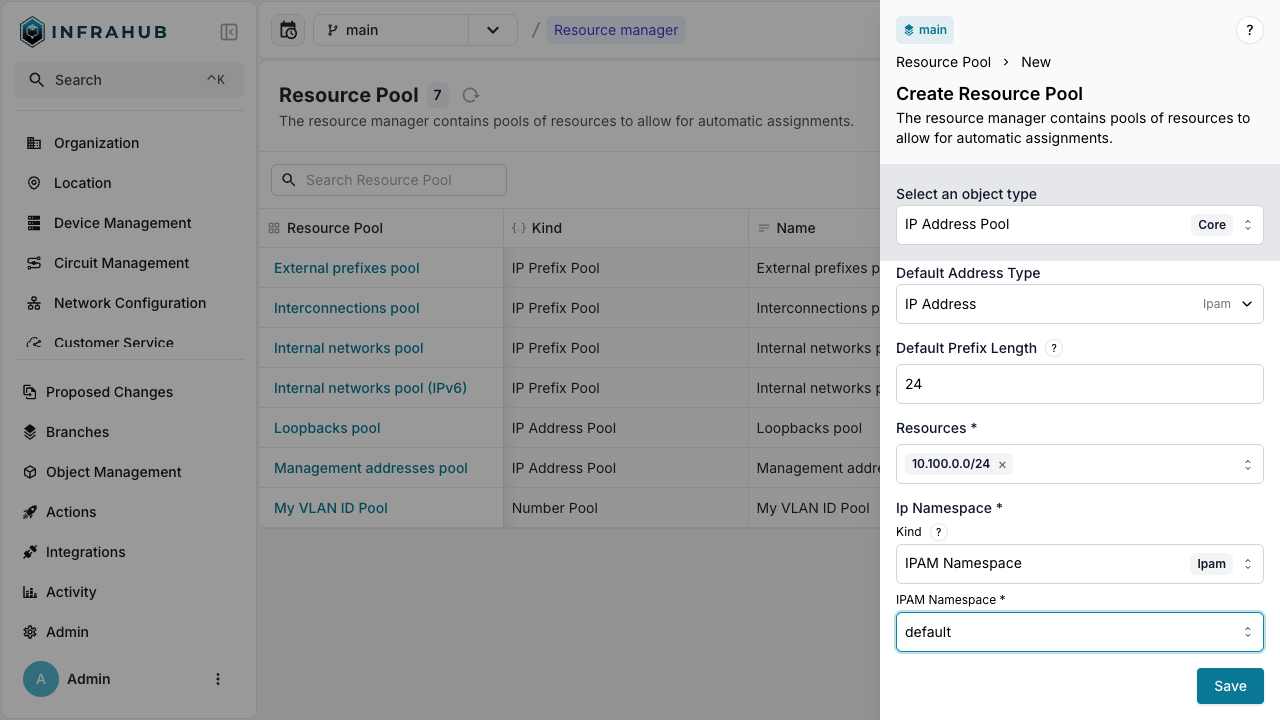
Step 2: Create the IP address pool
Create a CoreIPAddressPool Resource Manager:
- Web interface
- GraphQL
Navigate to Object Management → Resource Manager and create a new IP Address Pool with:
- Name:
My IP address pool - Default Address Type:
IpamIPAddress - Default Prefix Length:
24 - Resources: Select the
10.100.0.0/24prefix - IP Namespace:
default
mutation {
  CoreIPAddressPoolCreate(data: {
    name: {value: "My IP address pool"},
    default_address_type: {value: "IpamIPAddress"},
    default_prefix_length: {value: 24},
    resources: [{id: "<prefix-id>"}],
    ip_namespace: {id: "default"}
  })
  {
    ok
    object {
      id
      hfid
    }
  }
}
Save the pool ID for allocation operations!
Step 3: Allocate IP addresses
You can allocate IP addresses in two ways: direct allocation or allocation during node creation.
Direct allocation
Allocate an IP address directly from the pool:
- Web interface
- GraphQL
This method is currently not available in the Web interface. Use the GraphQL method instead.
mutation {
  InfrahubIPAddressPoolGetResource(
    data: {
      hfid: ["My IP address pool"]
      data: {description: "my first allocated ip"}
    }
  ) {
    ok
    node {
      id
      display_label
    }
  }
}
Include an identifier field to ensure the same IP address is returned on repeated calls:
mutation {
  InfrahubIPAddressPoolGetResource(
    data: {
      hfid: ["My IP address pool"]
      data: {description: "my first allocated ip"}
      identifier: "my-allocated-ip"
    }
  ) {
    ok
    node {
      id
      display_label
    }
  }
}
This is essential for Generators and automated workflows.
You have created an IP address record from the pool!
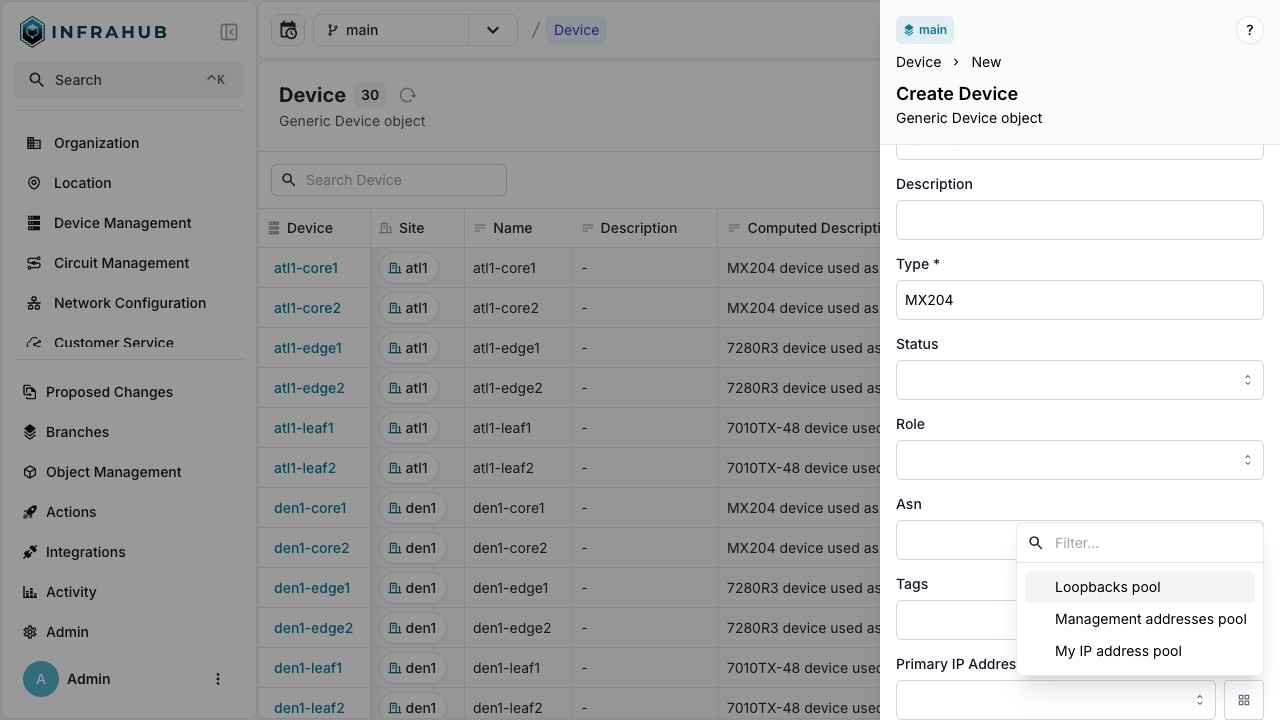
Allocation during node creation
Allocate an IP address when creating a device:
- Web interface
- GraphQL
Navigate to Devices → Add Device. Next to the Primary IP Address field, click the pools button and select your resource pool.

mutation {
  InfraDeviceCreate(
    data: {
      name: {value: "dev-123"}
      primary_ip: {from_pool: {id: "<POOL-ID>"}}
    }
  ) {
    ok
    object {
      display_label
      primary_ip {
        node {
          address {
            value
          }
        }
      }
    }
  }
}
The device is created with primary IP address allocated from the pool!
Allocate IP prefix
IP prefix pools (CoreIPPrefixPool) allocate IP subnets from larger prefixes.
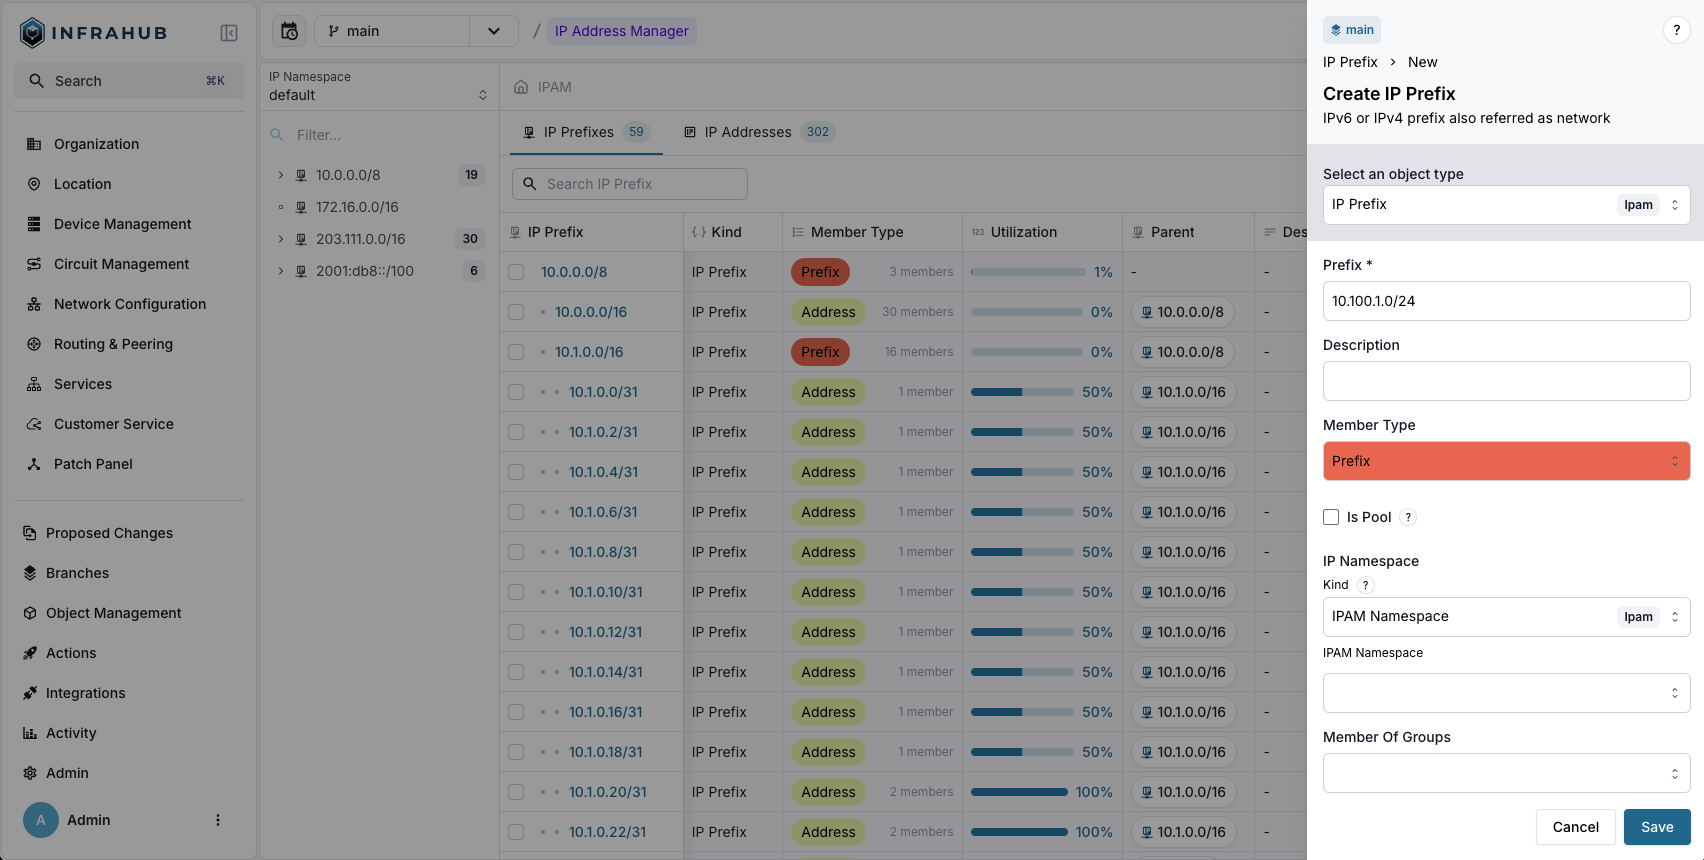
Step 1: Create a source prefix
Create the parent prefix:
- Web interface
- GraphQL
Navigate to IPAM → IP Prefixes and create a new prefix with:
- Prefix:
10.100.1.0/24 - Member Type:
prefix
mutation {
  IpamIPPrefixCreate(
    data: {prefix: {value: "10.100.1.0/24"}
    member_type: {value: "prefix"}}
  ) {
    ok
    object {
      id
    }
  }
}
Save the prefix ID for the next step!
Step 2: Create the IP prefix pool
Create a CoreIPPrefixPool Resource Manager:
- Web interface
- GraphQL
Navigate to Object Management → Resource Manager and create a new IP Prefix Pool with:
- Name:
Customer Service Pool - Default Prefix Type:
IpamIPPrefix - Default Prefix Length:
31 - Resources: Select the
10.100.1.0/24prefix - IP Namespace:
default

mutation {
  CoreIPPrefixPoolCreate(data: {
    name: {value: "Customer Service Pool"},
    default_prefix_length: {value: 31},
    default_prefix_type: {value: "IpamIPPrefix"},
    resources: [{id: "<prefix-id>"}],
    ip_namespace: {id: "default"}
  })
  {
    ok
    object {
      id
      hfid
    }
  }
}
Save the pool ID for allocation operations!
Step 3: Allocate IP prefixes
You can allocate IP prefixes in two ways: direct allocation or allocation during node creation.
Direct allocation
Allocate an IP prefix directly from the pool:
- Web interface
- GraphQL
This method is currently not available in the Web interface. Use the GraphQL method instead.
mutation {
  InfrahubIPPrefixPoolGetResource(data: {
    hfid: ["My IP address pool"]
    data: {
      description: "prefix allocated to point to point connection"
    }
  })
  {
    ok
    node {
      id
      display_label
    }
  }
}
You have created an IP prefix record from the pool!
Allocation during node creation
Allocate an IP prefix when creating a customer service:
- Web interface
- GraphQL
Navigate to Customer Service → Add Customer Service.
Next to the Assigned Prefix field, click the pools button and select your resource pool.
mutation {
  CustomerServiceCreate(
    data: {
      name: {value: "svc-123"}
      assigned_prefix: {from_pool: {id: "<POOL-ID>"}}
    }
  ) {
    ok
    object {
      display_label
      assigned_prefix {
        node {
          prefix {
            value
          }
        }
      }
    }
  }
}
Include an identifier field to ensure the same prefix is returned on repeated calls:
  mutation {
    CoreIPPrefixPoolCreate(data: {
      name: {value: "Customer Service Pool"},
      default_prefix_length: {value: 31},
      default_prefix_type: {value: "IpamIPPrefix"},
      resources: [{id: "<id of prefix>"}],
      ip_namespace: {id: "default"}
    })
    {
      ok
      object {
        id
        hfid
      }
    }
  }
Take note of the id and hfid of the CoreIPPrefixPool, we will use it in the next steps.
Allocating an IP prefix out of the pool
We can now start allocating IP prefix out of the CoreIPPrefixPool we created.
We can use the Resource Manager to allocate resources out of a pool in 2 different ways:
- Directly allocate a resource out of a pool. This is typically used when you need to allocate a resource that has no relation to other nodes. For example, allocating an IP address out of a pool that will be assigned to something that is not stored in Infrahub.
- Allocate a resource out of a pool to a relationship of a node. For example, create a device and allocate an IP address out of a pool and assign it to the device
Please refer to the Resource Manager Topic for further details.
Direct allocation of an IP prefix
Execute the following mutation to allocate an IP prefix out of the pool. Replace the id with the id of the CoreIPPrefixPool we created previously.
- Via the GraphQL Interface
  mutation {
    InfrahubIPPrefixPoolGetResource(data: {
      id: "<id of resource pool>",
      data: {
        description: "prefix allocated to point to point connection"
      }
    })
    {
      ok
      node {
        id
        display_label
      }
    }
  }
In the mutation we passed additional data to the allocated resource, in this case we passed a description attribute. This description attribute will be set on the IP prefix that was allocated. You can do this for any other attribute and relationship for the destination address type.
Allocating an IP prefix to a relationship of a node
Another way we can use Resource Manager is in situations where we create a node that has a relationship and we want to use a Resource Manager to allocate a new resource for that relationship. For example, we want to create a new customer service and assign a prefix of a pool.
This feature is not yet available directly via the Web Interface.
- Via the GraphQL Interface
In this mutation we use the from_pool resolver to indicate we want to allocate a assigned_prefix from a resource pool. Replace the id with the id of the CoreIPPrefixPool we created previously.
  mutation {
    CustomerServiceCreate(data: {
      name: {value: "svc-123"},
      assigned_prefix: {
        from_pool: {
          id: "<POOL-ID>"
          identifier: "svc-456"
        }
      }
    }
  ) {
    ok
    object {
      display_label
      assigned_prefix {
        node {
          prefix {
            value
          }
        }
      }
    }
  }
}
This is essential for Generators and automated workflows.
:::
You can allocate resources in an idempotent way by specifying an identifier in the GraphQL mutation. This identifier links the resource pool with the allocated resource allowing us to create idempotent allocation behavior. This is crucial when you want to allocate resources in an idempotent way using Generators.
Execute this mutation twice, note the identifier. The resulting IP prefix should be the same, as well as the id. Replace the id with the id of the CoreIPPrefixPool we created previously.
- Via the GraphQL Interface
  mutation {
    InfrahubIPPrefixPoolGetResource(data: {
      id: "<id of resource pool>",
      identifier: "my-allocated-prefix",
    })
    {
      ok
      node {
        id
        display_label
      }
    }
  }
Allocate number
Number pools (CoreNumberPool) automatically assign sequential numbers to numeric attributes.
Step 1: Create a number pool
Create a pool for VLAN IDs:
- Web interface
- GraphQL
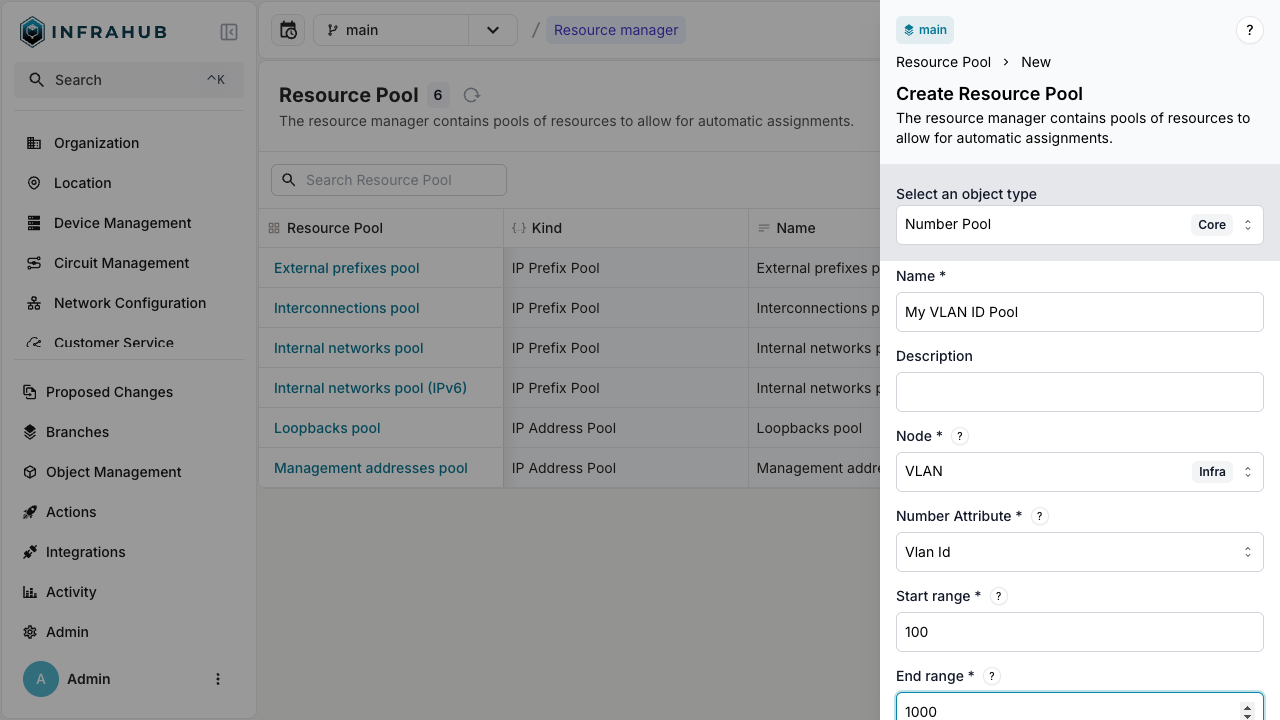
Navigate to Object Management → Resource Manager and create a new Number Pool with:
- Name:
My VLAN ID Pool - Node:
IpamVLAN - Node attribute:
vlan_id - Start range:
100 - End range:
1000
mutation {
  CoreNumberPoolCreate(
    data: {
      name: {value: "My VLAN ID Pool"}
      node: {value: "IpamVLAN"}
      node_attribute: {value: "vlan_id"}
      start_range: {value: 100}
      end_range: {value: 1000}
    }
  ) {
    ok
    object {
      hfid
      id
    }
  }
}
Save the pool ID for allocation operations!
Step 2: Allocate VLAN ID
- Web interface
- GraphQL
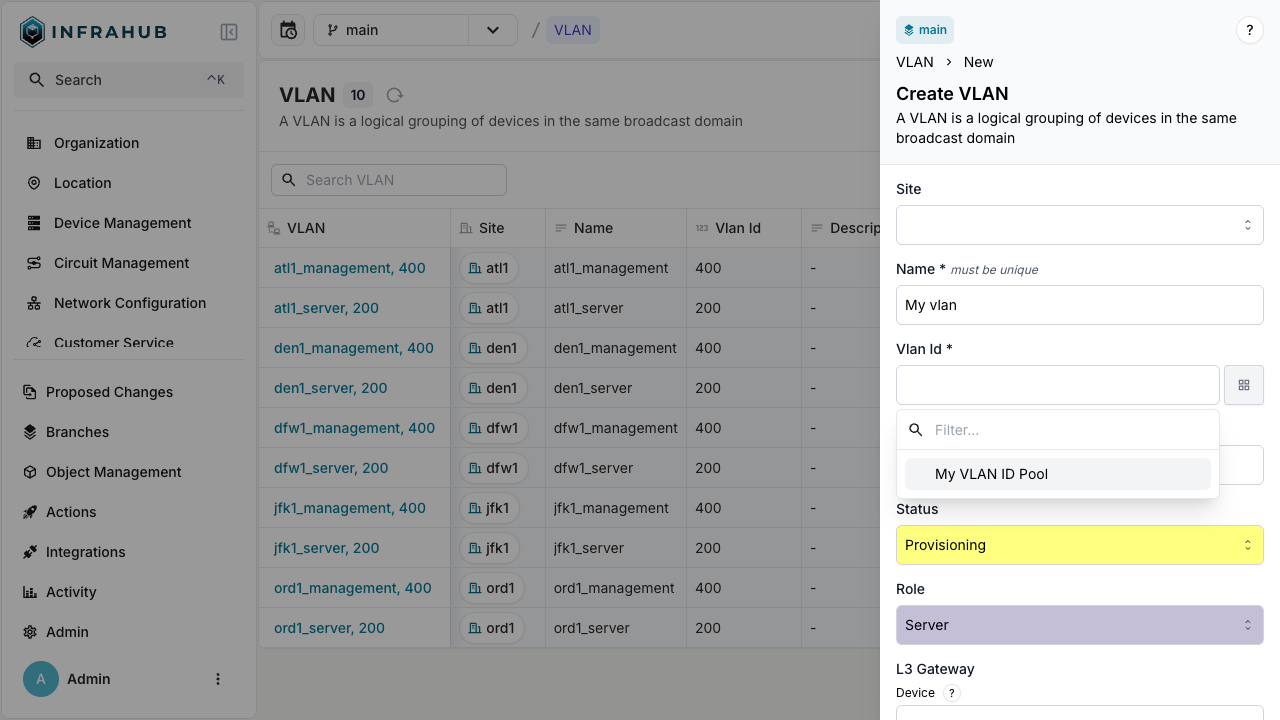
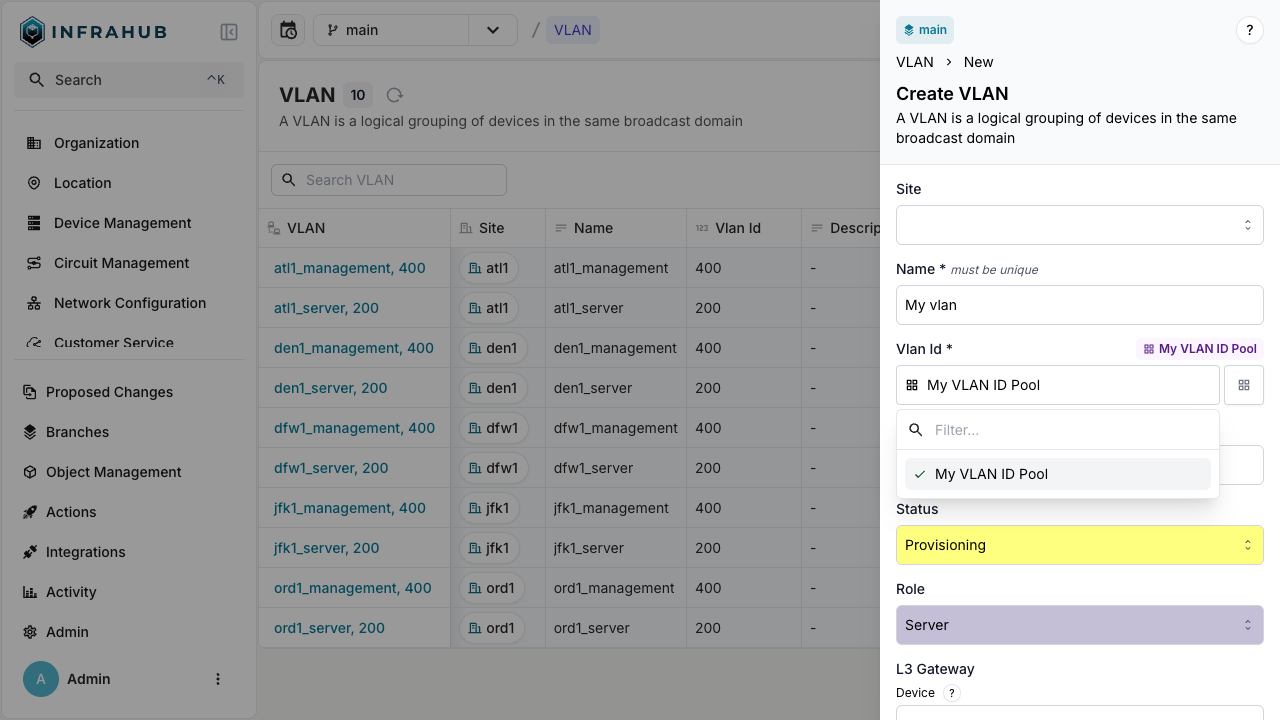
Navigate to VLAN → Add VLAN. Next to the VLAN ID field, click the pools button and select your number pool.
mutation {
  IpamVLANCreate(
    data: {
      name: {value: "My vlan"}
      vlan_id: {from_pool: {id: "<POOL-ID>"}}
    }
  ) {
    ok
    object {
      name {
        value
      }
      vlan_id {
        value
      }
      id
    }
  }
}
The VLAN is created with VLAN ID allocated from the pool!
Advanced use cases
Weighted allocation
When multiple resources can be allocated from a pool, you can control the allocation order using weights.
Adapt these steps to your existing schema.
While this example uses IP address pools, the same principles apply to IP prefix pools.
- Inherit from
CoreWeightedPoolResourcein your schema
# yaml-language-server: $schema=https://schema.infrahub.app/infrahub/schema/latest.json
---
version: "1.0"

nodes:
  - name: IPPrefix
    namespace: Ipam
    inherit_from:
      - "BuiltinIPPrefix"
      - "CoreWeightedPoolResource"
- Load the schema with this command:
infrahubctl schema load schema.yml
  mutation {
    InfrahubIPAddressPoolGetResource(
      data: {
        id: "<id of resource pool>",
    })
    {
      ok
      node {
        id
        display_label
      }
    }
  }
) {
  ok
  object {
    id
  }
}
}
mutation {
  IpamIPPrefixCreate(
    data: {
      prefix: {value: "10.100.6.0/24"}
      member_type: {value: "address"}
      allocation_weight: {value: 200}
    }
  ) {
    ok
    object {
      id
    }
  }
}
Save the prefix IDs for the next step!
- Create a
CoreIPAddressPoolResource Manager:
- Web interface
- GraphQL
Navigate to Object Management → Resource Manager and create a new IP Address Pool with:
- Name:
My Weighted IP address pool - Default Address Type:
IpamIPAddress - Default Prefix Length:
24 - Resources: Select the
10.100.5.0/24and10.100.6.0/24prefixes - IP Namespace:
default
mutation {
  CoreIPAddressPoolCreate(
    data: {
      name: {value: "My Weighted IP address pool"}
      default_address_type: {value: "IpamIPAddress"}
      default_prefix_length: {value: 24}
      resources: [
        {id: "<prefix01-id>"},
        {id: "<prefix02-id>"}
      ]
      ip_namespace: {id: "default"}
    }
  ) {
    ok
    object {
      id
      hfid
    }
  }
}
- Allocate an IP address from the pool:
mutation {
  InfrahubIPAddressPoolGetResource(
    data: {
      hfid: ["My Weighted IP address pool"]
      data: {description: "my first allocated ip"}
    }
  ) {
    ok
    node {
      id
      display_label
    }
  }
}
You should have received an IP address from the 10.100.6.0/24 prefix, as it has a higher weight (200) than 10.100.5.0/24 (100).
Branch-agnostic allocation
Resource Manager allocates resources across all branches to prevent conflicts.
- Create a test branch
infrahubctl branch create test
- Allocate an IP address in the test branch
mutation {
  InfrahubIPAddressPoolGetResource(
    data: {
      hfid: ["My IP address pool"]
      data: {description: "my IP allocated on branch test"}
    }
  ) {
    ok
    node {
      id
      display_label
    }
  }
}
- Check allocation status from the main branch
query {
  InfrahubResourcePoolAllocated(
    pool_id: "<POOL-ID>"
    resource_id: "<PREFIX-ID>"
  ) {
    edges {
      node {
        display_label
        branch
      }
    }
  }
  IpamIPAddress {
    edges {
      node {
        display_label
      }
    }
  }
}
The query shows the IP address is allocated in the test branch, preventing duplicate allocation in main, even though the IP address object doesn't exist in main yet.
Related resources
- Resource Manager topic - Deep dive into Resource Manager concepts and architecture
- Resource Manager blog post - Alternative learning resource with additional examples
- Generators topic - Learn how to automate resource allocation workflows
- IPAM topic - Additional information about IP address management
- Schema topic - Learn more about creating and managing schemas in Infrahub